Getly
Getly
By the end of this guide, you will know how to find clean loop points, align them at zero crossings, and use a crossfade when the waveform still jumps. You will also know how to test the finished loop so clicks do not appear in headphones, a sampler, or a video timeline.
Why a loop clicks
A digital audio file stores thousands of sample values that describe air pressure over time. Your editor plays those values in order. When playback reaches the loop end, it jumps back to the loop start and continues from that sample.
A click appears when the two points do not connect smoothly. For example, the final sample might sit near the positive peak while the first sample sits near the negative peak. The sudden jump creates a short burst of wide-frequency energy, which you hear as a click or pop.
Loop length can cause a second problem. A loop with the right musical length can still sound rough if the tail and head carry different rhythms, tones, or reverberation. Zero-crossing edits reduce a sample jump, but they cannot make two unrelated musical moments match.
Find a musically sensible loop range
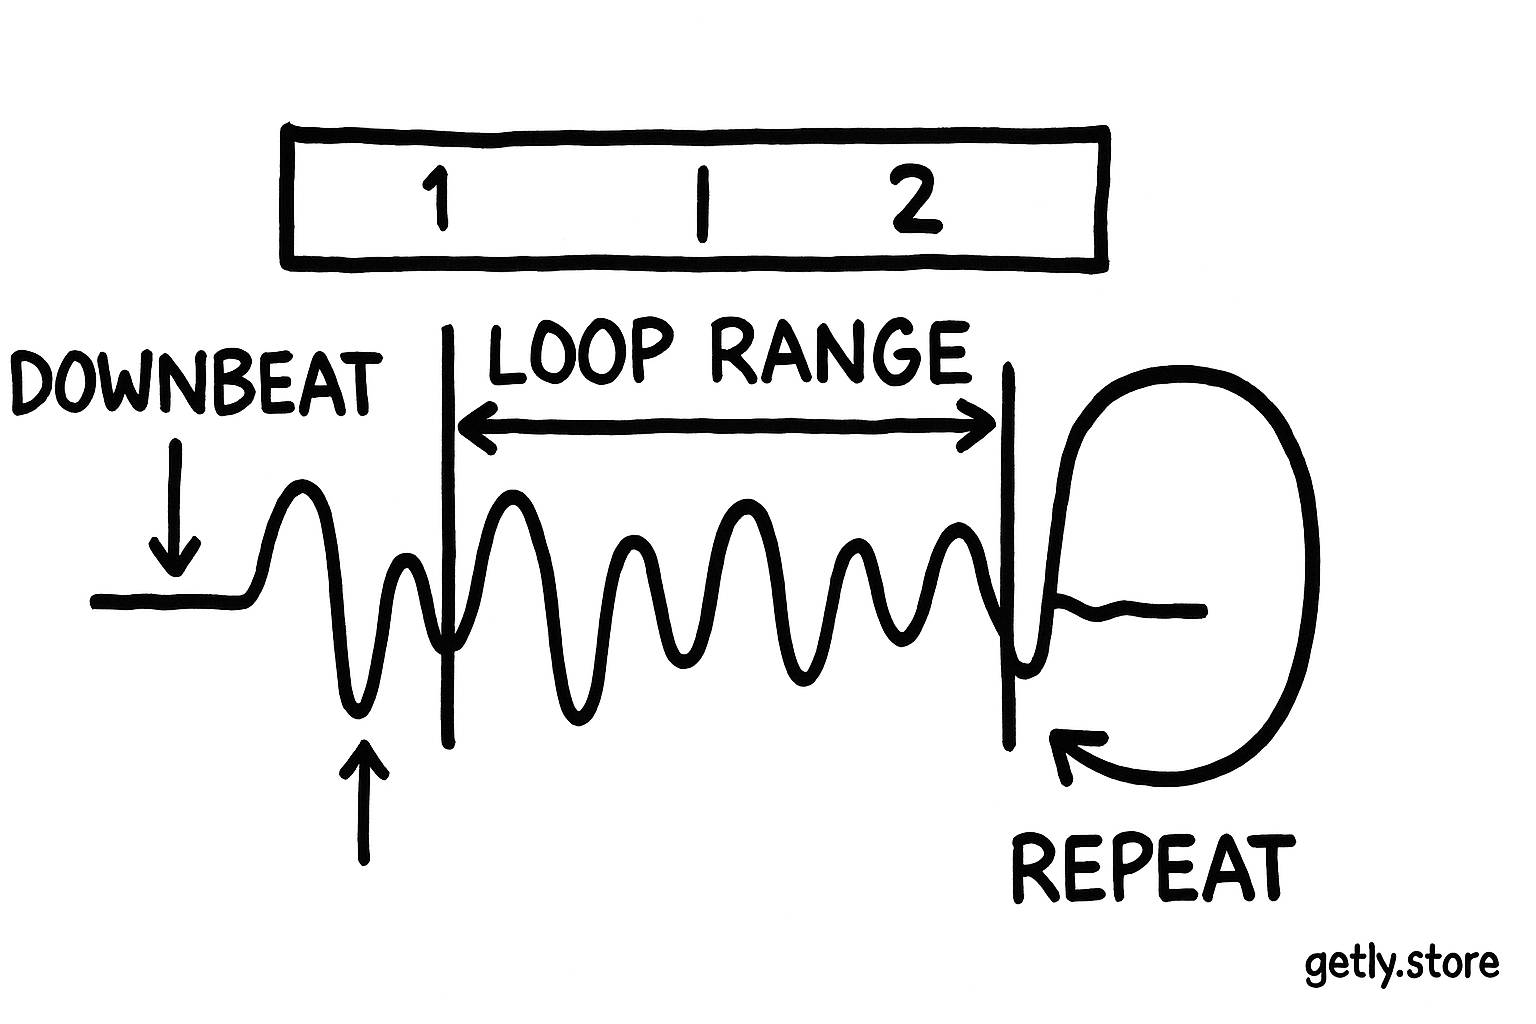
Start by locating the musical phrase, not the waveform edge. For a drum loop, place the start before the first clear downbeat and the end after the matching downbeat in a later phrase. For a pad or texture, listen for a stable section with similar energy at both ends.
Set your editor to show bars, beats, samples, or timecode. Use bars and beats to establish the phrase, then switch to a detailed waveform or sample view for the final cut. A loop that starts on beat two may sound clean at the waveform level but feel late every time it repeats.
Markers help you compare possible boundaries. Place one marker at the first usable downbeat and another at the same rhythmic position later in the file. Play the selected range repeatedly before you edit. This exposes changes in groove, pitch, and background noise that a single pass can hide.
Mark the first downbeat
Place the start marker just before the transient so the first hit keeps its attack.
Find the matching phrase
Move forward by a musical unit and locate a later downbeat with similar timing and energy.
Audition the range
Repeat the selection and listen for timing drift, tonal changes, or a background jump.
Use zero crossings for clean cuts
A zero crossing occurs where the waveform passes through the center line, which represents zero sample amplitude. Cutting near that point reduces the size of the jump between the last sample before the cut and the first sample after it.
Zoom into the start and end of your selected range. Look for a crossing that moves in the same direction at both boundaries. If the end crosses upward and the start also crosses upward, the transition usually keeps the waveform's local shape more closely than an upward-to-downward connection.
Choose the nearest suitable crossing on each side without damaging the rhythm. A zero crossing a few samples away from the musical boundary may work well. Moving the cut by several milliseconds can shift a drum transient enough to make the loop feel late or early.
Zero crossings help most with isolated hits, short effects, and simple sustained sounds. They cannot solve a level mismatch, a phase mismatch between stereo channels, or a reverb tail that stops at the boundary. Use a crossfade when the waveform still changes sharply after you align the crossings.
Do
- Zoom to the sample level before you place the final boundary.
- Keep the start and end near matching musical positions.
- Check both left and right channels in a stereo file.
Don't
- Move a boundary far from the downbeat just to reach a crossing.
- Assume a flat-looking waveform contains silence.
- Judge the edit from a single visual zoom level.
Apply a short crossfade when the cut still jumps
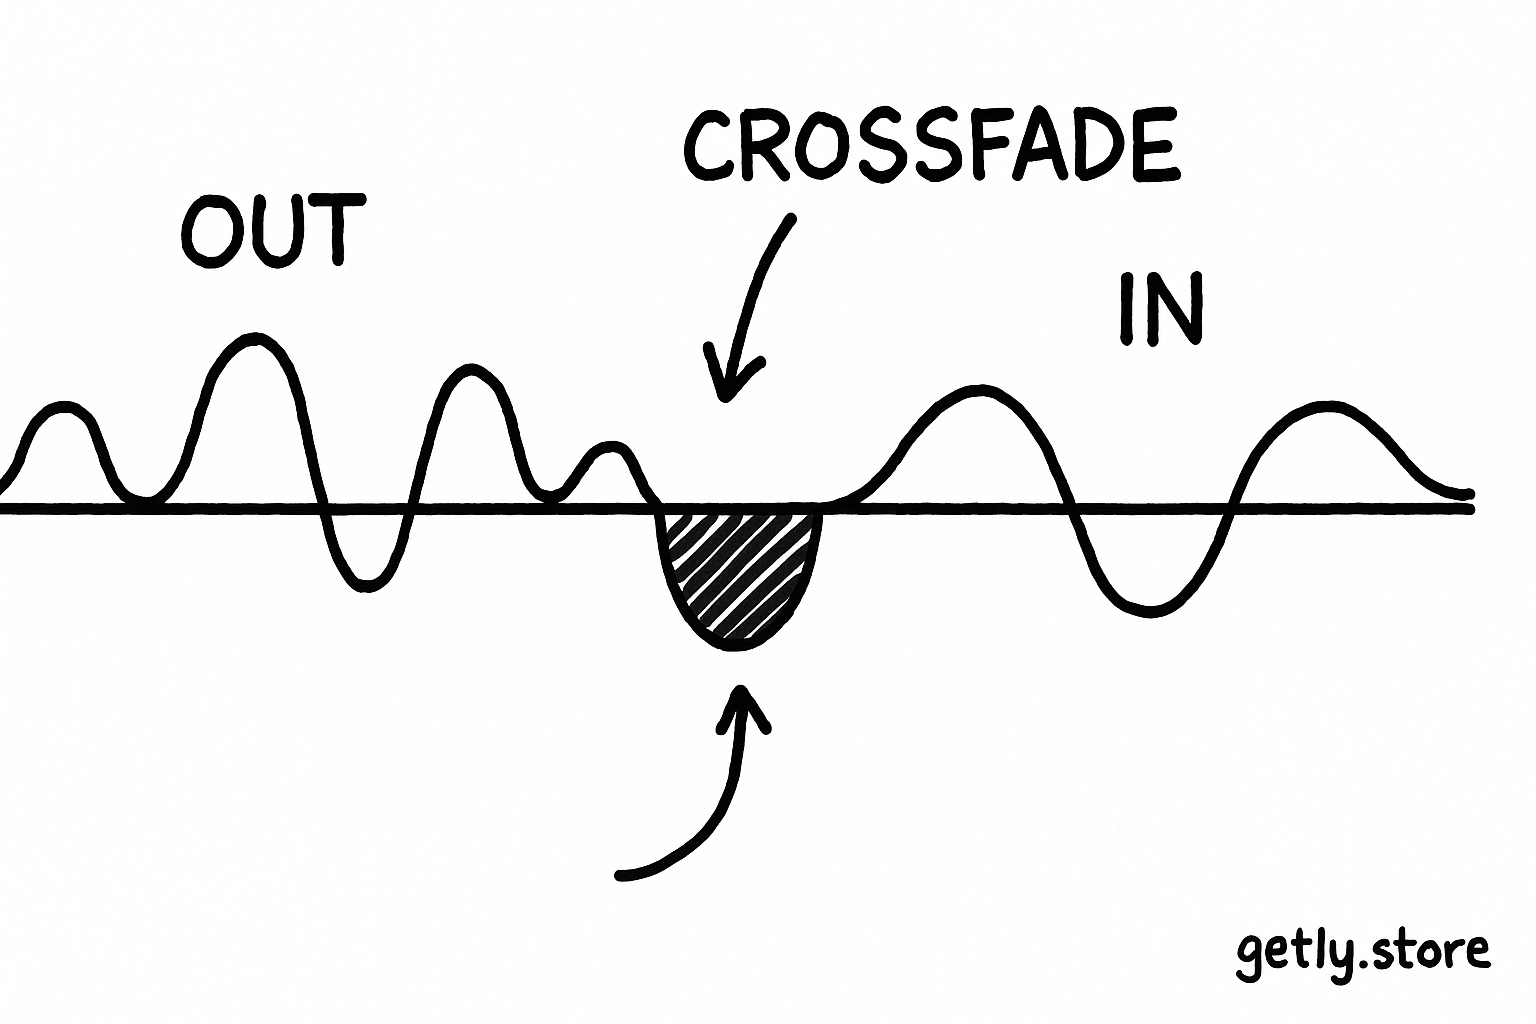
A crossfade overlaps the end of the loop with the beginning. The editor lowers one section while it raises the other, so the listener hears a blended transition instead of an abrupt sample jump.
Select a short region around the loop boundary and apply equal-power or constant-power fading when your editor offers that choice. Equal-power curves often preserve a steadier perceived loudness than two straight fades, especially when the overlapping material differs in level.
Start with a 5 to 10 millisecond crossfade for a percussive loop. Extend it toward 20 or 50 milliseconds for a pad, ambience, or sustained note. Listen after each change. A long fade can soften a kick, smear a snare, or create a second attack where the two transients overlap.
For a loop with a clear transient at the start, avoid fading across the attack unless you have matched another transient at the end. You can instead place the fade in a quieter section before the attack. That preserves the hit while the ambience makes the boundary less obvious.
Crossfades can also hide a small DC offset. DC offset shifts the waveform's center away from zero and can create a thump when playback jumps between sections. Remove the offset with your editor's analysis or normalization tools before you set the final loop points when you see the center line sitting above or below zero.
Test the loop in context
Solo the loop and repeat it for at least several cycles. Listen for the boundary at low volume first, then raise the level enough to catch a faint tick. Headphones reveal small clicks, while speakers reveal changes in bass, stereo width, and room tone.
Test the file at its intended playback speed. A loop that works at the original pitch may expose a click after a sampler stretches it or shifts it. Check the beginning and end at both normal speed and any common pitch settings you expect buyers or collaborators to use.
Watch the loop as well as listening. The first beat should begin at the expected position, the level should remain stable across repetitions, and the stereo image should not pull sideways at the boundary. If the image jumps, inspect the two channels for different zero-crossing points or different phase relationships.
Export a short test containing several repetitions. Reopen that export in a fresh session and loop it again. This catches errors caused by selection handles, hidden fades, temporary playback settings, or an export that includes an extra fraction of silence.
Choose the right fix
- Hear a sharp tick: move both boundaries to suitable zero crossings, then add a shorter crossfade if needed.
- Hear a dull bump: shorten the crossfade or move it away from a transient.
- Hear a rhythm shift: return to the bar and beat grid. The edit probably moved away from the intended downbeat.
- Hear a tone or room change: choose a more similar phrase, or use a longer overlap that blends the ambience.
- Hear a stereo jump: inspect channel alignment and phase before you adjust the fade length.
Export a loop that other tools can read
Keep the exported file the same sample rate and channel format as the project unless your delivery instructions require a conversion. A format conversion cannot repair a bad boundary, and a reduced bit depth can add noise to a very quiet loop.
Trim accidental silence outside the intended range. Leave the musical content intact inside the range, including the attack that gives the first beat its character. Name the file with its tempo, key, and length when those details matter, such as ambient-pulse-120bpm-Cmin-4bar.wav.
Save a version with the original edit points before you render the final file. That copy lets you shorten a fade, move a boundary, or prepare a different format without rebuilding the loop.
If you need a starting point for a finished rhythmic asset, you can browse a smooth trap loop and study how its phrase, transient, and tail fit together. Apply the same inspection process to any purchased audio before you place it in a larger production.
Common mistakes that cause clicks
Cutting at the loudest visible peak. The peak often carries the largest sample difference at the edit. Move the boundary toward a nearby zero crossing while keeping the beat position intact.
Using a long crossfade as a cure for every problem. A long overlap can cover a click while creating flamming drums, a phasey texture, or a noticeable volume dip. Adjust the range in small steps and listen to the first repetition as well as later ones.
Ignoring the tail. Reverb and delay continue after the main hit. If the loop ends before that tail resolves, the repeat can sound like a chopped-off room. Choose a later end point or blend the tail into a similar beginning.
Checking only one channel. A stereo file can cross zero at different times on the left and right sides. Inspect both channels and use a linked edit when your software supports it.
Testing only once. A boundary can sound acceptable during one pass because your attention follows the beat. Repeat the file several times, change the monitoring level, and reopen the export before you publish or deliver it.
Quick checklist
- Set the start and end on matching musical positions.
- Place each boundary near a zero crossing.
- Match crossing direction when you can.
- Use a 5 to 10 millisecond fade for a percussive starting point.
- Extend the fade only when sustained material needs more blending.
- Test several repetitions in headphones and speakers.
- Reopen the exported file and check the loop again.
Frequently asked questions
What causes a click at the loop point?
A click occurs when playback jumps between two sample values with a large amplitude difference. The jump creates a short burst of wide-frequency energy. A zero-crossing edit or a short crossfade can reduce that jump.
Does every loop need a crossfade?
No. A loop may work cleanly when both boundaries sit at suitable zero crossings and the musical material matches. Use a crossfade when the waveform, level, ambience, or stereo image still changes sharply.
How long should an audio crossfade be?
Start with 5 to 10 milliseconds for a percussive loop. Try 20 to 50 milliseconds for pads, ambience, or sustained sounds. Shorten the fade if it softens attacks or creates overlapping transients.
Why does my loop sound rhythmic even though it has no click?
The boundaries may sit at different musical positions, or the phrases may carry different groove and energy. Return to the bar and beat grid, match equivalent downbeats, and compare the material around both boundaries.