Getly
Getly
By the end of this guide, you will know how to install Procreate brushes, sort them into useful sets, and protect the original files. You will also tune a purchased brush so its size, pressure, texture, and stabilisation match the way you draw.
Prepare the brush files
Start with the file you downloaded from the seller. Procreate commonly accepts individual .brush files and collections in .brushset format. Keep the downloaded file in the Files app until you confirm that the brush works inside Procreate.
Use a simple folder structure before you import anything. Create folders such as New Brushes, Tested, and Backups. Add the seller’s original download to Backups, then copy it into New Brushes for installation. This gives you a clean source if you later edit or remove a brush.
Check the product notes for any included texture files, colour palettes, stamps, or installation instructions. A brush may depend on a separate grain image, but many Procreate brush products package all required resources inside the brush file.
Do
- Keep the original download outside your working brush set.
- Read the seller’s notes before you import a full collection.
Don't
- Rename or edit the only copy of a purchased brush.
- Delete the download after importing it.
Import brushes into Procreate
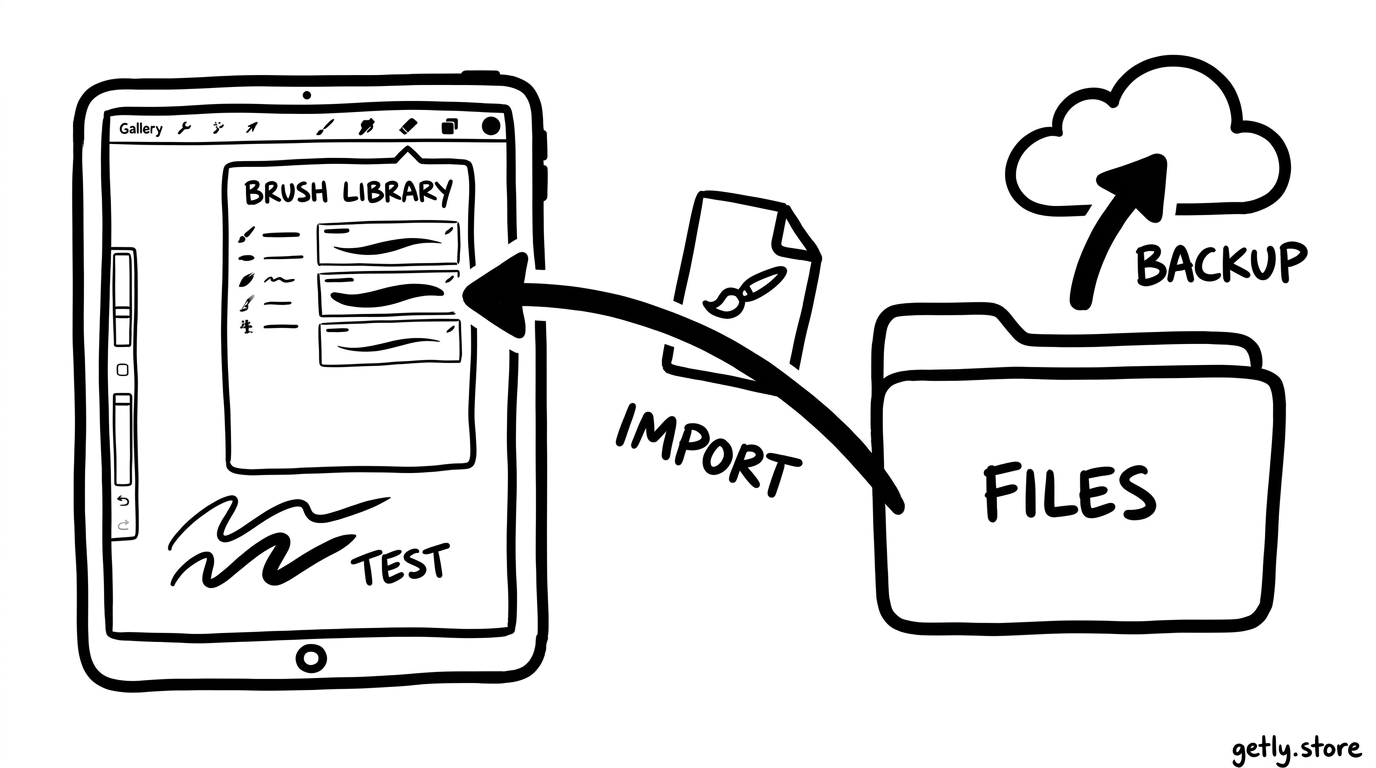
Open the Files app and locate the brush file. Tap the file, then choose Procreate from the share menu if Procreate does not open it automatically. Procreate imports an individual brush into the current brush library. A brushset usually creates or fills a set with several brushes.
You can also open Procreate first, open the Brush Library, and tap the plus button to enter Brush Studio. Use the Import option to select a brush file from Files. This route helps you choose the destination set before you start testing, especially when you have several downloaded products.
Watch the Brush Library after each import. Procreate may place an imported brush in a set you did not expect, or it may add a new set at the top or bottom of the library. Scroll through the sets and select the imported brush so you can confirm its name and thumbnail.
Locate the file
Open Files and find the .brush or .brushset download.
Send it to Procreate
Tap the file and choose Procreate, or use Brush Studio's Import command.
Confirm the result
Open the Brush Library and check the imported name, thumbnail, and set.
Test the brush on a blank canvas before you move or rename it. Draw a line, a curve, a dot, and a filled patch. These four marks expose most import problems: a missing texture, an unexpected opacity response, a stamp that points in the wrong direction, or a brush that produces no visible mark at your chosen colour.
Organise the Brush Library
Create sets around the job you perform, not around the seller’s name alone. Useful sets might include Ink, Paint, Texture, Lettering, and Reference. You can keep a separate set named after the seller when you want to preserve the original collection intact.
To move a brush, press and hold its thumbnail, then drag it into another set. Drag a set by its name to change its position in the library. Place your most-used set near the top so you spend less time scrolling during a drawing session.
Rename a duplicate when you customise it. A useful name includes the job and the change, such as Soft Ink, Small Pressure or Dry Texture, Slow Stroke. The name should tell you why you would choose that brush over another one.
Keep an Originals set for untouched copies. Duplicate a brush before you edit it by swiping left on its thumbnail and choosing Duplicate. Move the duplicate into the appropriate working set, then leave the original in Originals. This two-copy system makes experimentation safe and gives you a quick comparison point.
Build a controlled test sheet
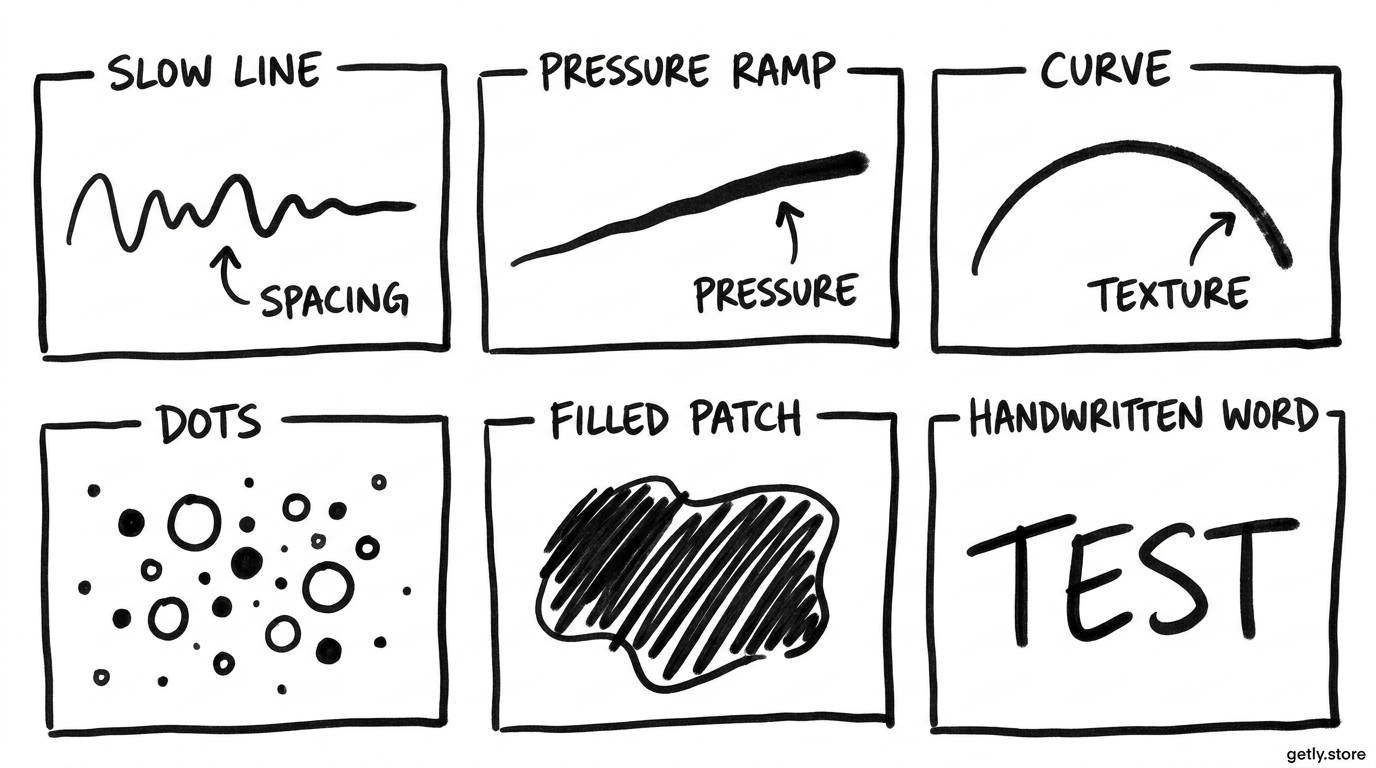
Open a new canvas for brush testing. Use the same canvas each time so you can compare changes without changing the paper texture, zoom, or colour. A small sheet with six labelled areas works well:
- Draw slow and fast lines to show spacing and lag.
- Draw light-to-heavy strokes to show pressure response.
- Draw a tight curve and a sharp corner to show stabilisation.
- Tap dots and short dashes to inspect the brush tip.
- Fill a patch with overlapping strokes to inspect opacity and build-up.
- Write a short word to check how the brush behaves in real use.
Use your usual grip, Apple Pencil angle, and hand speed. A brush that looks perfect under a slow demonstration stroke may feel too loose when you sketch at your normal pace. Test at the canvas size you use for finished work because a brush can feel different when you zoom in or out.
Record the settings beside each test. Write down the brush size, opacity, stabilisation amount, and any Brush Studio change. A short note such as “too scratchy at 12% size” gives you a clear next adjustment.
Tune a purchased brush to your stroke
Duplicate the purchased brush before you open Brush Studio. Tap the duplicate to open its settings, then change one group of controls at a time. Save the brush and test it after each group. This method shows which adjustment changed the feel.
Adjust the stroke path
Start with Spacing when the brush leaves visible gaps or repeated marks. Lower spacing for a smoother continuous line. Raise it when you want a dotted, stamped, or dry-brush rhythm. Use Jitter when you want the marks to shift around the stroke, but keep the amount small for lettering and controlled line work.
Use Fall Off when you want a stroke to fade as you draw. Turn it down for an even mark from beginning to end. Test this setting with a long stroke because a short line may hide the change.
Adjust stabilisation
Increase StreamLine or the related stabilisation controls when your hand needs help drawing smooth curves. A higher value can make the brush trail behind a quick gesture, so compare a slow curve with a fast one. Lower the value for sketching, expressive marks, and strokes that need immediate response.
Adjust pressure and size
Set the brush size and opacity in the main Brush Library before you edit pressure settings. Then use Brush Studio’s Apple Pencil controls if the brush changes too sharply or too weakly with pressure.
Reduce pressure sensitivity when a light touch makes the mark too faint. Increase it when you need a clear difference between delicate and firm strokes. Adjust size response separately from opacity response. You may want pressure to change thickness while keeping the colour nearly solid, or you may want opacity to build with repeated passes.
Check the Maximum and Minimum size values when the brush feels too large at the start or too narrow under light pressure. A narrow minimum size helps detail work. A wider minimum size suits broad paint and textured shading.
Adjust shape, grain, and rendering
Inspect the Grain controls when the texture looks too busy, too faint, or disconnected from your stroke. Change scale to alter the texture size. Change movement behaviour when you want the grain to stay fixed on the canvas or travel with the brush. Test both short marks and broad fills because the difference appears most clearly in overlapping areas.
Use Shape controls when the stamp has the wrong direction or creates an unwanted edge. A rounder shape creates a softer mark. A sharper shape creates a more defined tip. Rendering controls affect how the brush deposits colour and blends with marks underneath, so make small changes and compare overlapping strokes.
Save, compare, and use the tuned brush
Save the edited brush with a name that records its purpose. Keep the original beside it for comparison, but place the tuned copy in the working set you use for the project. Draw the same test marks with both brushes at the same size and opacity.
Use the tuned brush on a small part of a real illustration before you commit to a full page. A brush may behave well on a test sheet but create too much texture beside a flat colour or too much drag during a long outline. Keep the original copy available while you make this practical check.
Export your customised brush when you want a second backup. Open the Brush Library, swipe left on the brush, choose Share, and save the exported file to Files or another storage location. Export the full set when you want to preserve several related brushes together. Store the backup with the project note that records your preferred size and opacity.
Common mistakes
- Editing the only copy. Duplicate the brush before changing Brush Studio settings. The original gives you a reliable comparison.
- Testing with one stroke. Use lines, curves, pressure ramps, dots, fills, and handwriting. Each mark exposes a different part of the brush.
- Changing several settings at once. Adjust spacing, stabilisation, pressure, or grain separately so you can identify the useful change.
- Judging only at one zoom level. Test at the zoom and canvas size you use for finished artwork.
- Sorting by download order. Move brushes into sets based on your workflow. A texture brush belongs with other texture tools, even if the seller grouped it with inks.
- Deleting the source file. Keep the original download and export a backup of your customised copy.
FAQs
Why does my imported brush not appear where I expect?
Procreate may place an imported brush in a different set or at the end of the Brush Library. Search the library by scrolling through each set, then move the brush into your preferred set after you confirm that it works.
Should I edit the original purchased brush?
Keep the original untouched. Duplicate it first, edit the duplicate, and give the edited copy a name that describes its purpose or settings.
Which setting should I change when a brush feels too slow?
Lower stabilisation or StreamLine first, then test a quick curve. If the brush still feels slow, inspect spacing and grain movement because those controls can affect the mark’s response and texture.
How can I make a brush respond better to light pressure?
Test a light-to-heavy pressure ramp, then adjust the Apple Pencil pressure response and the brush’s minimum size or opacity. Change one control at a time and compare the result with the original copy.
Frequently asked questions
Why does my imported brush not appear where I expect?
Procreate may place an imported brush in a different set or at the end of the Brush Library. Scroll through each set, confirm that the brush works, and move it into your preferred set.
Should I edit the original purchased brush?
Keep the original untouched. Duplicate it before you edit the copy, then give the edited brush a name that describes its purpose or settings.
Which setting should I change when a brush feels too slow?
Lower stabilisation or StreamLine first and test a quick curve. If the brush still feels slow, inspect spacing and grain movement because those controls can affect the mark's response.
How can I make a brush respond better to light pressure?
Test a light-to-heavy pressure ramp, then adjust the Apple Pencil pressure response and the brush's minimum size or opacity. Change one control at a time and compare the result with the original.